 |
; |
Verdict: HIGHLY RECOMMENDED
Mitsubishi HC1600 Highlights:
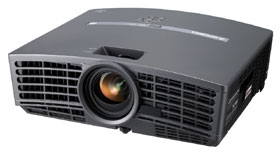
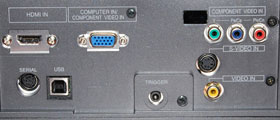
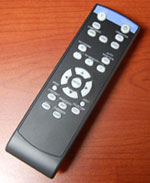
MSRP: $999.99 (USD) Just when many of us may have thought that 720p projectors had succumbed under the substantial weight of all things 1080p, along comes a most pleasant reminder in the form of Mitsubishi’s stellar and deliciously budget-friendly 720p home theater projector, the HC1600. FIRST IMPRESSIONS - Mitsubishi HC1600 Home Theater LCD ProjectorStyle & Appearance The first thing you’ll likely notice about the HC1600 is just how compact and lightweight it is. Measuring in at just (W x H x D) 12.2 x 3.9 x 9.6 inches (310 x 100 x 245 mm), the HC1600 tips the scales at a modest 6.5 pounds (2.9 kgs.). The color chassis is dark gray with square, straight edges that, from top to bottom, curve slightly downwards, adding a nice element of style that keeps it from being too bland and boxy. The lens is dead center, and save for the lens casing, it’s basically flush against the projector. The lens also features a lens cover that’s attached to the unit via a string. If you happen to be one of those people like myself that are prone to “temporarily” misplacing things, this feature guarantees you’ll have at least one less thing to worry about. To the left of the lens you’ll find the air vent that, of course, is angled away from the actual lens. It offers the standard (and limited) zoom (1.2:1) and focus rings, but those looking for vertical and/or horizontal lens shift will not find them here, although it does offer vertical and horizontal keystone adjustment. Just under the lens you’ll find one height adjustable leg, and atop of the projector you’ll find all of the standard buttons for power, keystone, menu, directional controls, and power and status light indicators, along with video, computer, and auto position. All things said, the HC1600 proves to be a compact and stylish projector that will never overwhelm or require you to rearrange items in your room to accommodate it. And for those of you that anticipate moving the projector around from time to time, its lightweight build is perfectly portable. Getting Connected From a connections POV, the HC1600 offers up everything you’ll need to enjoy the authentic HD movie or TV experience, all clearly labeled and nicely arranged. The rear panel inputs include HDMI (1), Component (1), S-Video (1), Composite (1), and RGB (1). It also features a Trigger Out, along with a USB and RS-232C inputs used for service purposes. Remote Control
PERFORMANCE - Mitsubishi HC1600 LCD ProjectorSet-Up A major bonus that the HC1600 home theater projector has going for it is the fact that it’s compact and light. This makes moving it around easy as can be. On the downside, once you’ve determined where you’d like it to go, you’d be best off just keeping it there, and for home theater purposes, you’ll quite likely do that anyway. The reason for this is because the HC1600 isn’t a short throw projector, offering a limited zoom lens of 1.2:1, and as mentioned earlier, it’s also devoid of any kind of vertical and/or horizontal lens shift. Depending on the size of your room and the projection screen, you’ll have to work a little harder to get the image projected just right, but the flipside to this is that once you’ve managed to set it up, you never have to worry about it again. In terms of the user menus, the HC1600 offers four menus (Image, Installation, Feature, and Signal) that contain a wide variety of sub-menus. If you’re looking for options to adjust and tweak your image, the HC1600 delivers the goods. From the Image menu, you can play with all of the usual goodies such as brightness, contrast, color, tint, sharpness, and color temperature. It also features BrilliantColor and Gamma mode, which, somewhat confusingly, doubles as the section where you’ll find image presets (Auto, Sports, Video, Cinema, and User1/ User2, along with Gamma reference adjustment points for Sports, Video, and Cinema on a High, Mid, to Low range. I say confusingly because the presets can be accessed by scrolling left to right, while the gamma can be accessed by pressing enter. Usually, the first instinct when accessing something from the menu is to hit enter, at which point, with this projector, you won’t even know there are image presets available. As far as the Gamma Mode goes, for those of you who aren’t keenly aware of what they can and can’t do, I’d avoid making any changes in here as the potential to detrimentally affect your image quality is quite high. And for those of you who can’t get enough of adjusting your image, the User mode in the Color Temperature section allows you to tweak your RGB for both brightness and contrast. The Installation menu allows you to adjust your Lamp Mode from Standard to Low, and depending on what's used, you can expect a maximum of 3000 lamp hours. If you plan on watching a lot of movies with the Mitsubishi HC1600 DLP projector, you’ll also find Cinema Mode in the Feature menu which essentially adjusts your image to a softer, more subdued visual palette that’s best suited for them. In a nutshell, save for that slight bit of confusion as pertaining to the Gamma Mode section from the Image menu, the user menus for the HC1600 are simple, direct, and offer a nice collection of practical functionality should you need to change things that will best suit your viewing preferences. Out-Of-Box Picture As always, initial testing on the HC1600 DLP home theater projector necessitated using solely out-of-box, factory default settings. The test subject was BBC’s sublime Planet Earth series via an HDMI, 720p/1080i connection, and the Pioneer BDP-51FD Blu-ray player. Images almost instantaneously jumped out at you, as colors were rich and vibrant – something that isn’t normally associated with DLP projectors. Blacks were good, and the contrast did a good job displaying those less than obvious image details. While the picture out of the box wasn’t quite as bright and snappy as that found on one of the reigning, 720p home theater projector all-time champions, the Epson 720, the HC1600 was at least comparable, and that alone impressed me. I then made the following adjustments:
As per the above changes, color saturation looked more natural, yet still retained that vibrant look. Blacks were marginally better and overall image contrast improved a bit, too. For those that prefer an even punchier image, there are two ways to do so. You can first increase the BrilliantColor from the Image menu, and you can also access the Lamp Mode from the Installation menu and adjust from Low mode to Standard. Standard mode is the default setting, but I myself preferred Low mode because if you’re in a darkened room, the difference is negligible really. If you happen to be in a room with some spill of light, natural or otherwise, you can perhaps offset this by keeping it in Standard mode. Another aspect of the image that really struck a cord with me was just how cinematic and filmic everything looked. It’s one thing to get a bright, vibrant image, but it’s quite another to get a bright, vibrant image that avoids the “digital-looking” trap where images lack depth and texture. In the case of the HC1600, it manages to satisfy on all levels. A couple of colleagues even commented that certain sequences from Planet Earth looked like 1080p images, and all of this bodes quite well for the HC1600 and those looking for an affordable home theater projector that doesn’t skimp on image quality and performance. Let’s now take a look at the calibration for Mitsubishi’s HC1600 DLP projector. Calibration With the ideal color temperature being 6500K, a calibration for a dark, home theater room was done. Feeling extra generous than usual today, below are the calibrated numbers I arrived at:
Via the Color Temperature menu, the following RGB adjustments for ideal, 6500K white balance were made:
As the above numbers would suggest, by simply dialing back the modest red and blue push in the high (70 IRE) and low (15 IRE) brightness ranges, color accuracy/purity was improved, and as such, the contrast between the various color elements in each scene were rendered that much better. Now for those of you out there considering a professional calibration on the HC1600 DLP projector, based on projector cost and the additional cost of a professional calibration (likely in excess of $400), I’d personally take a pass. Image quality out of the box is already above-average, and simple adjustments in the comprehensive user menus will be more than enough to give you an image that’s pleasing to the eyes. FINAL THOUGHTS - Mitsubishi HC1600 Home Theater LCD ProjectorDespite the potential of this sounding like over-inflated hyperbole, I can unequivocally say that the HC1600 from Mitsubishi is one the best 720p home theater projectors I’ve come across based on bang-for-buck value. Images manage to be equal parts punchy and cinematic, and when you factor in an unbelievably affordable MSRP price tag in the neighborhood of $999, minor blemishes such as a limited zoom lens and no vertical and/or horizontal lens shift become mere afterthoughts. DETAILED SPECIFICATIONS - Mitsubishi HC1600 LCD Projector
Highly Recommended
Video Projector Reviews
|
JVC DLA-X30 Review |
||||||||||||||||||||||||||||||||||||||||||||||||||||||||||||||||||||||||||||||||||||||||||||||||||||||||||||||||||||||||||||||||||||||||||||||||||||||
|
Home • Projector Brands • Video Projector Reviews • Projector Resources • Contact Us
|
|||||||||||||||||||||||||||||||||||||||||||||||||||||||||||||||||||||||||||||||||||||||||||||||||||||||||||||||||||||||||||||||||||||||||||||||||||||||


